How To Pick The Right Home Inspector.

How To Pick The Right Home Inspector.

 
Home Inspectors have had a bad rap for quite some time, and probably for good reason. Back in the good ol’ days, anyone could stick a magnet with a logo on the side of their truck, tie a ladder to the roof, and call themselves a Home Inspector! Ta da! Everyone’s probably heard of someone who’s been “ripped off” by their Home Inspector. Blatantly obvious issues with a property are missed; Inspection reports are a mess, convoluted, and confusing. The buyer/seller has no real knowledge of the property after the $400+ Inspection fee, and feel taken advantage of because the Inspector was only on site for a short period of time. Trust me, even I have had a personal experience with this very situation before I got into the Home Inspection business, and it continues to happen today! And it’s not just the client who’s left out in the cold, the Realtor takes a big brunt of the fall out as well. You know the old saying, “one rotten apple to spoil the bunch”, well that certainly holds true within our profession. And in doing so, the “rotten apples” really cast a shadow over everyone else in the industry who genuinely cares about what they are doing.

So what can we do about it?

In Alberta and B.C. Home Inspectors are now required to have a Government issued licence in order to legally work as a Home Inspector. In order to even be able to apply for government issued license you need all of the following:

  • Proof of education training from an approved Home Inspection program

  • Proctored test inspections

  • Errors and Omissions Insurance

  • Surety Bond

  • An approved contract

That in itself is expensive and time consuming, and is designed to deter the “rotten apples” from offering inspection services. In addition to meeting these new requirements, most Inspectors will also be a member of a reputable association. These associations have their own list of requirements which the member must obtain to keep their membership in good standing. Continuing education credits being a big one.

Sounds like the “rotten apples” are taken care of…..right?

Any Home Inspector who is true to their craft will gladly do everything that is required of them in order to provide their clients with the best Inspection service possible. But, as usual there are still the entitled few, who think the rules don’t apply to them. The reality is that there are still a large number of people working without a license. They may call themselves “Home Consultants” or “Building Experts” in order to cheat the system, but in the end it’s the rest of us who are being cheated. It’s very important to ask your Inspector to see a copy of their license, and you have every right to do so. The truth is, there are many excellent Inspectors who go above and beyond every day to provide the best service possible for their clients, and we consider ourselves to be among them. A list of licensed inspectors can be found here on the APHIS website.

Doing Our Part To Flatten The Curve

Doing Our Part To Flatten The Curve

As the COVID-19 outbreak continues to evolve, we want to assure you that Nu Level Inspections is doing everything we can to take added precautions and keep our clients and employees safe. This is our number one priority.

During your home inspection we will be taking precautionary measures to do our part in reducing the spread of the virus. We will wear latex gloves and have extra gloves for clients attending the inspection. We will also have disinfectant wipes on hand to clean any areas that we may have come in contact with.

We request that you limit the number of people attending the inspection to as few as possible. Children, elderly and anyone with a compromised immune system or showing signs of the virus, is asked not to attend. If you are not comfortable with being present, we are happy to go through the inspection report with you in full detail with via telephone.

We are honoured that our customers recognize Nu Level Inspections for its exceptional customer service. We are committed to meeting these expectations during this time of uncertainty, while doing our part to join the global movement to “flatten the curve” and protect the health and safety of everyone who relies on our business.

Jeff Howells

Nu Level Inspections Inc.

What Is Included In A Home Inspection?

What Is Included In A Home Inspection?

So, you have put in an offer on a home you are looking to purchase, and your realtor advises you to have a home inspection done. Most people do not use home inspectors very often, so having one that you know and trust in your contact list is probably unlikely. Your realtor will typically have a short list of companies that they have worked with in the past, and recommend…..but what is the inspector actually looking for? We have complied a list of items that all inspectors should be inspecting in order to meet the industry Standard Of Practice. This list is not all encompassing but it gives you an idea of what to expect. (different associations carry different standards that their inspectors must work to, but they are all fairly similar)

Keeping in mind that a home inspection is a visual inspection, and invasive testing and inspection methods are not permitted (ie. cutting holes in walls), a standard home inspection should include the following.

1) EXTERIOR: A complete examination of the exterior of the property:

Roofing material, wall cladding, windows, doors, trim, soffits, gutters and downspouts, lot grading, retaining walls, decks, fences, pergolas, sun-rooms and detached garages will be inspected and documented in the inspection report.

2) MECHANICALS: This will include an inspection and testing of the heating and air conditioning system, plumbing and electrical systems. Any items found not working correctly, or near the end of their typical life cycle’s, will be noted in the inspection report.

3) STRUCTURE: A visual inspection of all visible areas of the structure on the home. foundation walls, floor, wall and roof framing.

4) INSULATION: Insulation material in the walls (if visible) and in the attic will be documented and measured for depth to give a general R-Value.

5) INTERIOR: The entire interior of the home will be inspected. Appliances are tested via normal operating controls, plumbing fixtures tested, electrical outlets are also tested for correct wiring and safety functions.

The inspection should take approximately 2-3 hours depending on the condition and size of the home. Any defects will be photographed and noted in the inspection report.

THE REPORT: Your inspection report is required to be ready within 24 hours of the inspection. Some companies will have it for you the same day. It should detail everything that was inspected, with recommendations (and photos) for repairs/improvements and timelines for said items. If a component was not inspected, it must be detailed as to why.

ADDITIONAL SERVICES

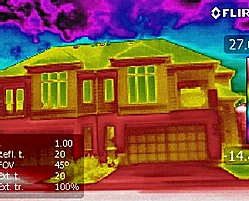
Some companies will have additional services that you can add to your home inspection. Thermal Imaging, Radon testing, Mold and Indoor Air Quality testing, Sewer line Inspections, are some examples. Check with your service provider to see what they offer.

THINGS TO BE AWARE OF

1) Be aware of inspectors carrying multiple certifications.

On average it takes 4 years for someone to become a Journeyman tradesman. So, if your inspector is claiming to be “certified” in multiple areas, asking for clarification might be prudent. That’s not to say that the inspector is not qualified or does a bad job, but it can be misleading. For example, there are Home Inspector Associations that offer “Certification Courses” to their members. IE: Certified Electrical Inspector, Certified Plumbing Inspector, Certified Septic Inspector, Certified Mold Inspector etc.. and the inspector can hold any number of these certifications. (there’s more than 45 of them!) There is a lot of good information in the courses, but they are designed as a marketing tool, both for the association to attract more members, and for the inspector to advertise to their clients. However, the certifications are not recognized anywhere outside of the Association, and they are not the same as a Journeyman or Red Seal Ticket in a specific trade.

2) Beware of warranties and guaranties offered on inspection services:

YOUR HOME INSPECTED RIGHT OR WE’LL BUY IT!! Warranties and guaranties are insurance policies, again typically offered through the inspectors association. There will be a long list of limitations and items that are excluded from the policy, and a deductible will apply. Again, these are designed to be more of a marketing tool than a safety net for the client.


Testing for Mold

Testing for Mold


Mold spores are everywhere in our environment, indoors and outdoors. Certain spores can lead to allergy symptoms, while others can become more harmful. In the course of a home inspection, clients are most often concerned with mold as a result of water damage, but high indoor humidity levels can also cause significant issues for occupants.

HOW CAN YOU IDENTIFY A POTENTIAL MOLD PROBLEM?

The indoor environment might seem damp or musty. There can be signs of moisture in basements or attics, or you may notice windows have some condensation build-up during the winter months. A hygrometer can be purchased from most hardware stores, and will measure air’s water-vapor content in the home. A home’s relative humidity should be between 30% to 50% RH. (This will change a lot as it gets colder outside. See chart below)


Nu Level Inspections Inc. offers (IAQ) Indoor Air Quality assessments. This service can be added to any home inspection, or done as a separate assessment. During these inspections our home inspector will go through the home and identify potential problems, including moisture issues that can lead to mold. They will also take 3 air samples (one outdoor and two indoor air samples), which are then sent to a certified lab for analysis. You will receive a complete report of all spore counts, their typical sources, and any recommendations for further action, if needed.

What does Mold Need To Grow?

Mold feeds off of many building materials found in homes, such as paper, wood and carpeting. The ideal temperature for mold growth is 77°F to 86°F. It also needs a moisture source. Generally, that moisture will come from water leaks, high humidity, or condensation. If the conditions are not right, the mold will go dormant and not grow.

How Do You Remove Mold?

If the mold is on a surface that can be cleaned, simply wash it away with a soapy solution. You must be very thorough because any remaining spores will be able to regenerate. If the mold has made it into your walls or carpet, there is a good chance those materials will need to be removed.

What are Ice Dams?

What Are Ice Dams?

Ice Dams

An ice dam is ice that forms at the roofs edge. The gutter become filled with ice and prevent melting snow (water) from draining off the roof. The water can back up behind the dam under the shingles and leak into the home causing damage to walls, ceilings, insulation and other areas.

Ice dams are a result of basically 3 conditions:

1) Snow on the roof

2) Heat loss from the building into the attic space

3) Nonuniform roof surface temperatures

This winter has been a long one in Calgary (2017-18). Lots of snow and extended periods of cold temperatures have taken a toll, especially on homes susceptible to ice dams. What happens is this:

The roof surface is warmer near the ridge than it is near the gutters. This is because heat loss from the house warms up the upper surface, while the areas over the soffits, stay cold. The snow melts, runs down the roof and re-freezes as it reached the gutters. This process continues (as long as it stays cold outside), until the gutters are full of ice and the water can no longer drain away. The more snow there is, and the longer it remains cold outside, the larger and more problematic the dams become. With a large snow load on a roof, the dams can become quite large and often dangerous, as large icicles can form.

How To Fix It?

Temporary Action: Remove the snow from the roof. Be careful not to damage the shingles. A roof rake can be used to safely remove the snow. We do not recommend walking on a roof covered in ice and snow, for obvious reasons.

Permanent Action: Seal all ceiling penetrations into the attic. Lighting fixtures, bathroom exhaust fans, attic hatch, speakers in ceilings, recessed lighting etc.. all need to be properly sealed to prevent heat loss. (See our blog on Attic Rain). Next, increase insulation levels and attic ventilation. This will keep the attic space cold and prevent the snow on the roof from melting. This will also cut down on your heating costs.

Jeff Howells is a Professional Home Inspector and a member of the Alberta Professional Home Inspectors Society (APHIS).


How is Thermal Imaging used in a Home Inspection?

How is Thermal Imaging used in a Home Inspection?

The benefits of infrared technology in today’s home inspections are numerous. A trained thermographer can spot anomalies that would not otherwise be visible. But first let’s talk about what Thermal Imaging actually is so we can better understand its capabilities and its limitations.

Myth: Thermal imaging cameras can see through walls. This is false.

Fact: Thermal imaging cameras detect surface temperature only!

The basic principles of thermal imaging are as follows. All materials, which are above 0 degrees Kelvin (-273 degrees C), emit infrared energy. The infrared energy emitted from the object is converted into an electrical signal by an imaging sensor in the camera and displayed as a color or monochrome thermal image. Clear as mud right? Good. Now let’s talk about how we use this to our advantage during a home inspection.

Let’s say we are looking at an exterior wall from inside the home. We know that the wall is typically constructed of wood, insulation, and drywall. Normally we would not know if there was missing insulation or moisture inside the wall unless we cut a hole and looked. But, if we look at the same wall with a thermal imaging camera, we can now see the surface temperature of the drywall, which is the key in spotting irregularities within the wall assembly. Any missing insulation or water damage inside the wall for example, will change the surface temperature in that affected area and would then become visible in contrast to the unaffected area. The home inspector would identify the anomaly and further investigate. Most importantly, there needs to be a temperature difference (ideally at least 10°) between outside and inside for an issue to be visible with the camera. Without a temperature difference, the surface temperature of the wall would be the same, and show nothing.

 
Other anomalies the camera can help identify.
  • Visualize energy losses

  • Detect missing or defective insulation

  • Source air leaks

  • Find moisture in insulation, in roofs and walls.

  • Locate water ingress in flat roofs

  • Detect framing issues

  • Find faults in supply lines for in-floor heating

  • Detect electrical faults

At Nu Level Inspections, we include thermal imaging with every home inspection, at no additional cost. Please contact us for more information on any of our services.


How Much Does A Calgary Home Inspection Cost?


How Much Does A Calgary Home Inspection Cost?

This is the most popular question we get asked by people inquiring about our services. The Inspection fee is based on a number of different factors. While there is no standard fee guide to regulate home inspection prices in Calgary there is an industry standard which most companies will stay within in order to stay competitive. While we can’t speak for other companies, Nu Level Inspections base our fees on the following:

1) Square footage: This is the approximate size of the home (not including the basement). The basement still gets inspected, but it does not affect the price of the Home Inspection. As the size of the home gets bigger, there is more for the inspector to evaluate, and therefore the cost would increase accordingly.

2) Age of the home: As a home gets older, they can become more complicated to inspect. Years of “homeowner repairs” can be quite time consuming to go through and ensure a thorough Home Inspection. Typically, additional fees are applied to homes that are over 50 years old. So a home built in the 1950’s would cost more to inspect than a home of the same size, built in the 1980’s. Accordingly, a Century Home would cost more than a home built in the 1950’s.

3) Additional Services: We offer additional services that can be added to any home inspection. Mold testing (air quality tests), Radon testing, swimming pools & spas, etc. would all increase the price of the inspection. We include Thermal Imaging with every home inspection at no additional cost.


The price of the Home Inspection also takes into consideration the Home Inspection report. 
After the inspection is complete, your inspector will write a report containing all the information gathered during the inspection and provide it to you. This report can easily add an hour or more to the inspection time. The inspection fee will also include travel time for the inspector. As
 a general rule of thumb, a standard Home Inspection in Calgary should be within the $400-$550 range, before any additional services. Please be sure to read our bl
og How To Pick The Right Home Inspector It details all the requirements for Home Inspector licensing and the importance of hiring a licensed inspector.
 

What Is Attic Rain?

What Is Attic Rain?

It’s winter in Calgary and we have experienced some very cold temperatures this year. While some people love our winter season, others can’t wait for it to be done, especially when it reeks havoc with your home. We have been called out to a couple of homes this year to investigate a common problem with regards to moisture. More specifically, water stains on attic ceilings, and water leaking through ceiling light fixtures! It’s call Attic Rain, and it is a common problem for a lot of homes built within the last 15 years or so.

What is it?

Attic rain happens when large accumulations of frost in the attic, quickly melt due to warm outdoor temperatures, causing water damage to the home. It’s is caused by a combination of 4 contributing factors:

1) Air leakage from the home into the attic via ceiling penetrations. (pot lights and bathroom fans are the main ones)

2) A higher air pressure inside the home than outside.

3) Humidity levels in the home are too high for cold outdoor temperatures.

4) Inadequate attic ventilation. (Non-venting soffits)

New homes are built to be very energy efficient, which means they are insulated and sealed up to be as air-tight as possible. Reduced air leakage means lower heating and cooling costs, great! But the devil is in the details, and if the details are not done properly, problems can arise.

Imagine it’s -25°C outside, you have the thermostat set to 21, and the humidifier set to 40% (because that’s what the builder told you to do, to keep the new hardwood floors from drying out). If the air pressure inside the home is even slightly higher than outdoor pressure, the house air will pass through openings in the exterior walls and ceilings to move to the lower pressure areas. As it escapes into the -25° attic, from things like pot lights and bathroom exhaust fans, the warm humid air, condenses and freezes when it contacts the cold surface of the roof deck. The problem is compounded due to non-venting soffits installations (now a fire code and Alberta building code requirement) reducing the amount of attic ventilation needed to help the attic breathe. The longer it stays cold outside, the more frost accumulates. Once it warms up outside, the frost melts, and presents itself in the forms of water stains on the ceiling, water streaks running down the exterior surface of walls, leaks from ceiling fixtures etc. The insulation will also be wet, and roof framing members can be wet to the point of saturation.

Melted frost from the attic, running down the siding.
 
Melted frost from the attic running down the siding.
 
With the thermal camera, water in the attic is visible.
 
With the thermal camera, water in the attic is visible.
 

How do we prevent it?

1) Fill the holes

First you must identify and fix the “holes” in the ceiling. Things like pot lights, bathroom exhaust fans, attic hatches must all be 100% sealed, to prevent house air from spilling into the cold attic. An assessment should be done to identify the leakage spots and seal the holes to prevent further leakage.

Holes in recessed lighting vapor barrier boot.
 
2) Balance the air pressure in the home

A HRV (heat recovery ventilator) is typically used for this. It helps balance the indoor air pressure and provides an air exchange for the home by exhausting the same volume of air as it draws in. It also provides an extra level of efficiency to the furnace by preheating the incoming air (outside air) with the heat from the exhausted air (house air). It provides higher indoor air quality as well. If your home does not have an HRV it should be equipped with some type of ventilation system. There should be a wall switch located near the thermostat labeled “ventilation fan”, turn it on.

3) Adjust the humidity level

If your house has a humidifier installed, you will need to adjust the humidity setting regularly, but the only way to know what the actual relative humidity reading is in the home is to measure it. You will need a hygrometer for this. Amazon is a good place to find one, and they’re fairly inexpensive. As the temperature drops, lower the humidity level. This is done by running the ventilation system(s), HRV’s, kitchen and bathroom exhaust fans, etc. Even simply opening a window or two will help. (providing it’s not too cold outside) -25°C outdoor temperature = approx. 10% RH indoor.

4) Non-venting soffits

For homes built after 2009, a change in the Alberta Fire Code states that roof soffits that project into the side yard be non-vented to help prevent fire from an adjacent property from spreading into the attic space. This requirement reduces the amount of airflow into the attic space. Regular roof vents are now installed at the edge of the roof to accommodate for this change, but homes built directly after the code change likely do not have them installed.